What are iOS Profiles and how do you use them
Profiles are the method Apple has designated for device control, such as which app a device is locked into, what apps the user will have access to and what WiFi networks are established on the device, etc. Profiles enable you to quickly and reliably update your user experience. There are different types of profiles that can be pushed to the devices. The following article will provide additional information on the types of profiles and the capabilities of each:- Restrictions
- Passcodes
- Wi-Fi
- Web Clips
- App Lock
- Global Proxy
- Web Content Filter
- Home Screen Layout
- Custom
- Provisioning
Creating a Profile
Creating a profile within Moki is a straightforward process.- Make sure you find yourself within the Profiles tab.

- Either stay within the All Tab or find the desired profile that you want to create. Either way you will need to choose which profile you want.

- Click on the “New Profile” button and fill out the desired information then click “Save”.

- Your profile will now be created allowing you to see all of the account’s profiles.


Deleting a Profile
- Make sure you find yourself within the Profiles tab,
- Click on the desired profile on the left hand side of the screen.
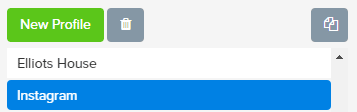
- Click the Trash Can Icon, where a confirmation pop out will appear asking you to “Confirm Deletion.”
- The profile will then be deleted.


Adding a profile to a Device
When adding a profile to a device you are given three different options on doing so. These include:- Enrollment Template
- Device Groups
- Profiles dropdown


Restrictions
Restrictions profiles allow you to restrict which apps, device functionality, and media content are available to the user. While most of the options can be unchecked there are a few that impact a kiosk or locked down scenario more than others, which we will focus on below:
- Name – Use your own desired naming practices for the profile name
- Payload Removal Disallowed – Prevents the ability to remove the profile locally on the device
- Add a tag – You can place a tag on this profile which will then make this profile visible to restricted admins
- Autonomous App – Any apps listed in this text box will be allowed to access Autonomous Single App Mode (SAM). If the apps you want to allow aren’t listed in your Moki account you’ll need to get the bundleID of the app and type it in, such as com.apple.mobilesafari.
- App Blacklist (supervised only) – Any apps listed in this text box will not be allowed on the device. If the app is installed on the device, like Safari, then it will be hidden
- App Whitelist (supervised only) – The apps listed in this text box are the only apps visible on the device. IF the apps you want aren’t listed in your Moki account you’ll need to get the bundleID of the app and type it in. Here is a list of all Apple app’s bundleIDs.

Functionality Section
- Allow use of camera – Allows the user of the device to use the camera and any apps that use the camera
- Allow FaceTime – Can allow the camera but restrict access to FaceTime
- Allow installing apps – App Store apps only
- Allow removing apps (supervised only) – Controls a users ability to remove the app from the device, doesn’t affect the ability to remove the app from the Moki platform
- Allow Erase All Content and Settings (supervised only) – Hides the Reset option for Erasing All Content and Settings but leaves the Reset All Settings option
- Allow modifying account settings (supervised only) – Controls a users ability to change logged in account settings
- Allow documents from managed sources in unmanaged destinations – Controls whether information, like photos, can be accessed in the app type
- Allow documents from unmanaged sources in managed destinations – Controls whether information, like photos, can be accessed in the app type
- Allow Passbook notifications in Lock screen – Controls a Lock screen item
- Show Control Center in Lock screen – Controls a Lock screen item
- Show Notification Center in Lock screen – Controls a Lock screen item
- Show Today view in Lock screen – Controls a Lock screen item
- Allow UI App Installation – Allows native Apple apps like Clock and Camera to be visible
- Allow Changing of Passcode (supervised only) – Controls the user’s ability to change the passcode
- Allow Changing of Device Name (supervised only) – Controls the user’s ability to change the name of the device on the iPad
- Allow Enterprise App Trust – Controls whether you can trust the developer of an enterprise app. Enterprise apps have to be trusted before they can be installed
Media Content
Apps – You must set this at or above the rating of the app you desire to usePasscodes
Specify the passcode policies enforced on the device such as length, complexity and the number attempts.
- Name – Use your own desired naming practices for the profile name
- Payload Removal Disallowed – Prevents the ability to remove the profile locally on the device
- Add a tag – You can place a tag on this profile which will then make this profile visible to restricted admins
- Allow simple value – Permit the use of repeating, ascending, and descending character sequences
- Require alphanumeric value – Requires passcode to contain at least one letter and one number
- Minimum passcode length – Choose the smallest number of passcode characters allowed
- Minimum number of complex characters – Choose the smallest number of non-alphanumeric characters allowed
- Maximum passcode age (1-730 days, or none) – Choose the days after which the passcode must be changed
- Maximum Auto-Lock – Choose the longest auto-lock time available to users
- Passcode history (1-50 passcodes, or none) – Choose the number of unique passcodes before reuse of a previous passcode
- Maximum grace period for device lock – Choose the longest device lock grace period available to the user
- Maximum number of failed attempts – Choose the numbe rof passcode entry attempts allowed before all data on the device will be erased
Wi-fi
You can create a Wi-Fi profile to send to one or multiple devices. The profile will allow a device to connect to the Wi-Fi network specified in the profile.
- Profile Name: Use your own desired naming practices for the profile name. Something easily identifiable will be beneficial if you plan on having multiple Wi-Fi profiles in your account
- Network Type: Configures network to appear as legacy or Passpoint hotspot
- SSID: The Service Set Identifier (SSID), commonly known as the network name, should be input here. Keep in mind that the SSID is case sensitive
- Hidden Network: This allows the specified network is open or broadcasting.
- Auto Join: Allows you to turn off/on whether the device automatically joins the network.
- Disable Captive Network Detection: Captive Network detection will be bypassed when the device connects to the network
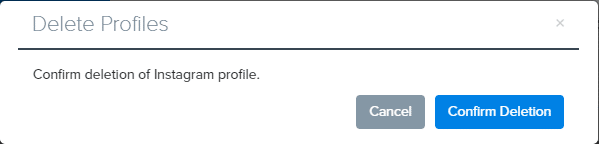
- Disable Association MAC Randomization (iOS 14+): Disables MAC address randomization for a Wi-Fi network while associated with that network. This feature also shows a privacy warning in Settings indicating that the network has reduced privacy protections. The setting will change the Private Address setting that is present under the Wi-Fi network.
- Proxy Setup: Change this option from None if you connect to your network by proxy.
- If you select Automatic then you’ll need to enter the proxy server URL that retrieves the proxy settings.
- If you select Manual then you’ll need to enter the Hostname or IP address as well as the port and authentication required
- Security Type: Select security type from the list. If you are not sure, a quick Google search will help you learn how to identify which security type your network is running

Web Clips
Specify a URL to be added to the Home Screen for quick access.
- Name – Use your own desired naming practices for the profile name. Something easily identifiable will be beneficial if you plan on having multiple WiFi profiles in your account
- Payload Removal Disallowed – Prevents the ability to remove the profile locally on the device
- Add a tag – You can place a tag on this profile which will then make this profile visible to restricted admins
- Label: This is the label of the Web Clip. This text will appear directly beneath the icon on the user’s iOS home screen.
- URL: The URL that you want the icon to launch.
- Removable: Allows the Web Clip to be removed locally on the device
- Icon: Image for the Web Clip. Recommended size is 152 x 152 pixels. If you don’t specify an icon, a capture of your web page will be used as the icon.
- Precompressed icon: Sets whether the icon has added visual effects
- Full Screen: This will remove the navigation bars normally found at the top and bottom of the Safari browser.
- Ignore Manifest Scope- Allows you to determine if you are given the ability to travel to other websites without showing the URL.
App Lock
Allows you to lock the device to a single app.
- Name – Use your own desired naming practices for the profile name. Something easily identifiable will be beneficial if you plan on having multiple WiFi profiles in your account
- Payload Removal Disallowed – Prevents the ability to remove the profile locally on the device
- Add a tag – You can place a tag on this profile which will then make this profile visible to restricted admins
- Application – Select the app you want the device to locked to. If the app isn’t in your Moki account you’ll need to add the bundleID for the app manually
- Disable touch screen – Disables all touches to the screen
- Disable device rotation – Disables the ability of the screen to display content in the other orientation from what the device is in when the profile is applied
- Disable volume buttons – Disables the ability to change the volume locally on the device
- Disable ringer switch – Disables the ability to change the ringer settings locally on the device
- Enable Voice Control- Allows Apple’s Voiceover functionality to be controlled.
- Disable sleep/wake button – Disabled the ability to lock the device or wake it up locally and prevents the ability to turn the device off. This does not prevent a hard reboot of the device
- Disable Auto-Lock – Disables the Auto-Lock timer from locking the device according to its setting
- The remaining features refer to Accessibility options of General settings – typically these aren’t used in a kiosk or digital signage scenario so we will just list the settings without giving a description
- Enable VoiceOver
- Enable zoom
- Enable Invert Colors
- Enable AssistiveTouch
- Enable Speak Selection
- Enable Mono audio
- Allow user to adjust VoiceOver
- Allow user to adjust zoom
- Allow user to adjust Invert Colors
- Allow user to adjust AssistiveTouch
Global Proxy
Sets the HTTP PROXY settings for your network traffic to run through. If your company runs web traffic through a global proxy then this allows you to set the HTTP PROXY settings for your network traffic to run through.
- Name – Use your own desired naming practices for the profile name. Something easily identifiable will be beneficial if you plan on having multiple WiFi profiles in your account
- Payload Removal Disallowed – Prevents the ability to remove the profile locally on the device
- Add a tag – You can place a tag on this profile which will then make this profile visible to restricted admins
- Proxy Type – there are two types of proxies, Manual and Auto
- Manual
- Server and Port – Hostname or IP address, and port number for the proxy server
- Username – Username used to connect to the proxy
- Password – Password used to authenticate with the proxy
- Allow bypassing proxy to access captive networks
- Manual
-
- Auto
- Proxy Server URL – Input the URL that the PAC (Proxy Auto-Config) will use to retrieve the settings
- Allow direct connection if PAC is unreachable
- Allow bypassing proxy to access captive networks
- Auto
Web Content Filter
This profile allows you to filter what is available within the browser on the device.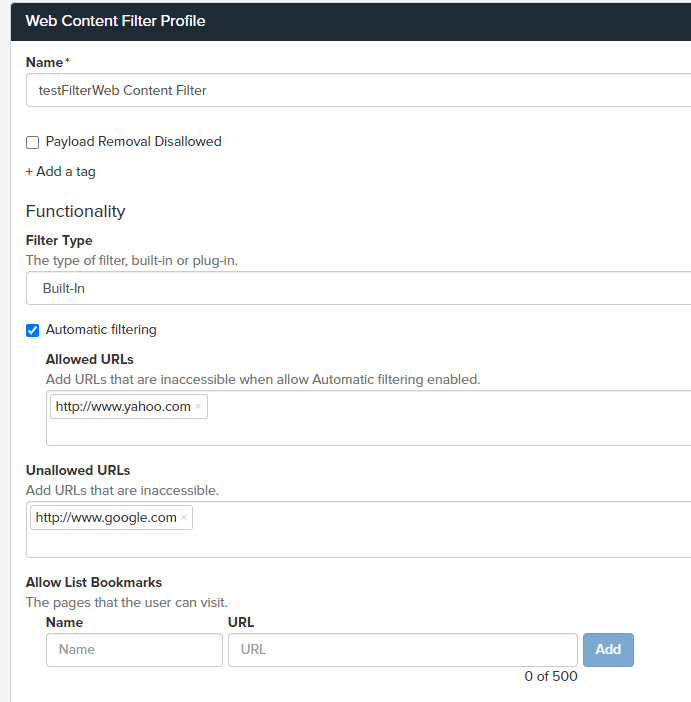

- Name- Use your own desired naming practices for the profile name.
- Filter Type- Allows you to choose between the variousFilter types
- Allowed URLs- Allows you to add sites that are not accessible when automatic filtering is enabled.
- Unallowed URLs- Allows you to block certain sites to be accessed.
- Allow List Bookmarks- This determines which sites are able to be accessed within the browser
Home Screen Layout
This profile allows the user to sort the order of apps and pages on the device.
- Name- This will allow you to customize the name of the profile.
- Screen- By dragging and placing certain apps on the screen, you are able to customize the pages and the order in which that the apps show. You will need to make sure the apps are already downloaded on the device.
Custom
This is where you would go to upload profiles created in Apple Configurator.
- Import Profile – Brings up a file selector so you can import your profile
- Check to upload unsupported policy type – This needs to be checked if the profile you are importing contains any information for elements outside the options Moki gives you. For example Apple Configurator allows you to configure blacklists and whitelists for specific websites but Moki does not. In this scenario you would need to check this box
Provisioning
Allows you to create install a Provisioning Profile to a device.
