Profiles provide a way to control certain settings and configurations on devices. There are different types of profiles that can be pushed to the devices. The following article will provide additional information on the types of profiles and the capabilities of each.
WI-FI
You can create a Wi-Fi profile to send to one or multiple devices. The profile will allow a device to connect to the Wi-Fi network specified in the profile.
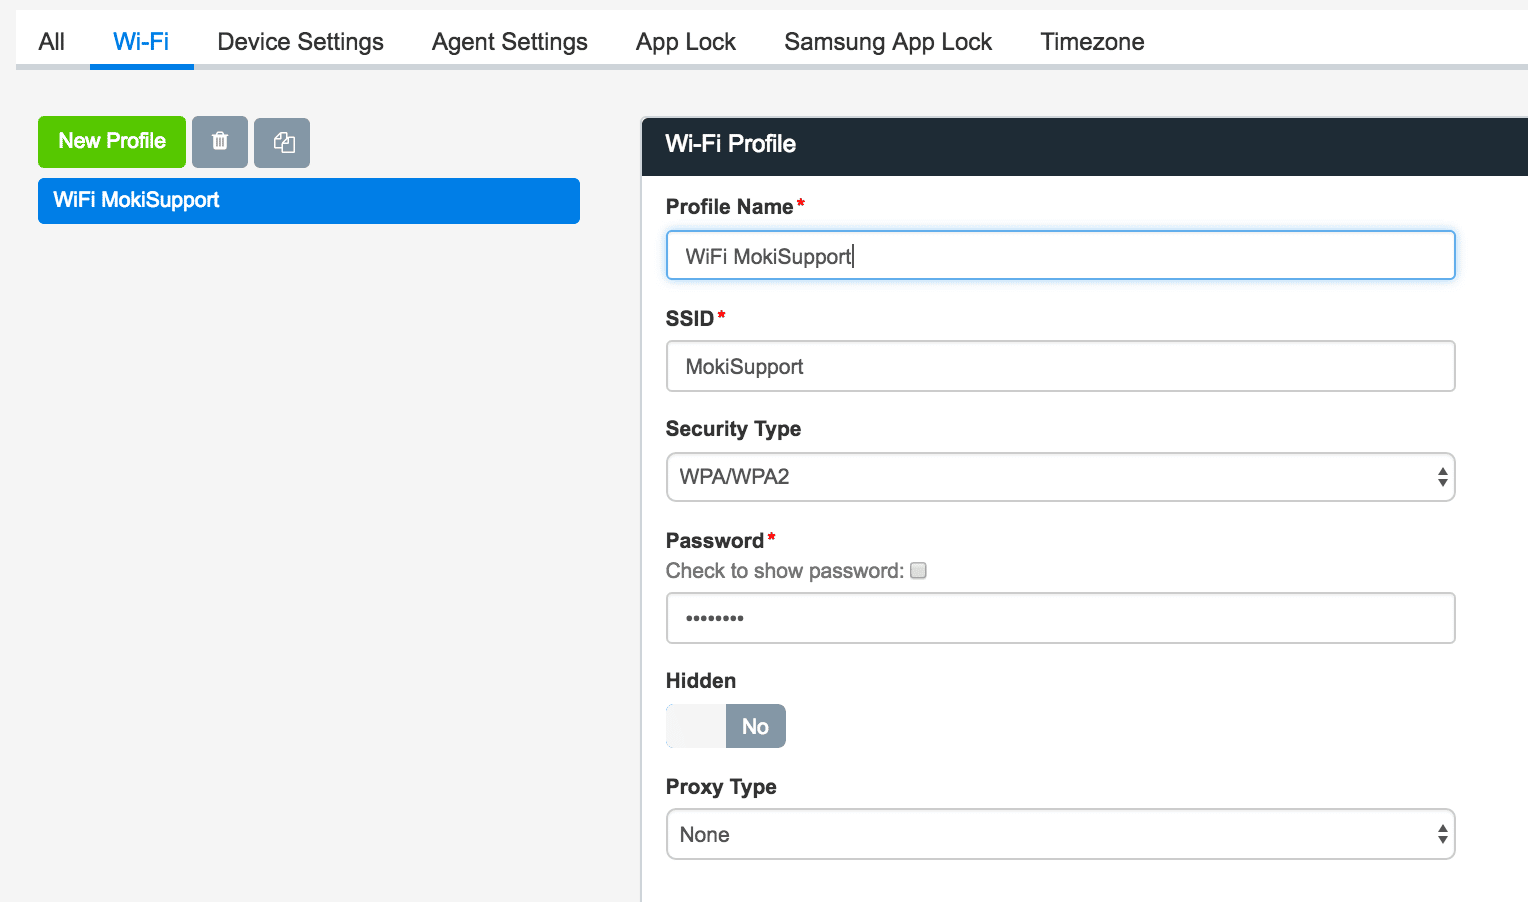
- Profile Name: Use your own desired naming practices for the profile name. Something easily identifiable will be beneficial if you plan on having multiple Wi-Fi profiles in your account
- SSID: The Service Set Identifier (SSID), commonly known as the network name, should be input here. Keep in mind that the SSID is case sensitive
- Security Type: Select either the WEP or the WPA/WPA2 security type from the list. If you are not sure, a quick Google search will help you learn how to identify which security type your network is running
- Password: Enter the network password here
- Hidden: If the network is set up as hidden, meaning the SSID is not broadcast, you will need to toggle this to Yes
- Proxy Type: Change this option from None if you connect to your network by proxy. If you select Automatic then you’ll need to enter the proxy server URL that retrieves the proxy settings. If you select Manual then you’ll need to enter the Hostname or IP address as well as the port and authentication required
After filling out the necessary information, click the Save button. The profile will be saved and can be pushed to devices from the Devices or Device Groups tab.
DEVICE SETTINGS
Not all devices accept all of these settings options but most will. The only way to know for sure is to apply them to your device. If you see an Agent version next to a feature it means that the device needs Agent on the device with that version or above for the feature to work.
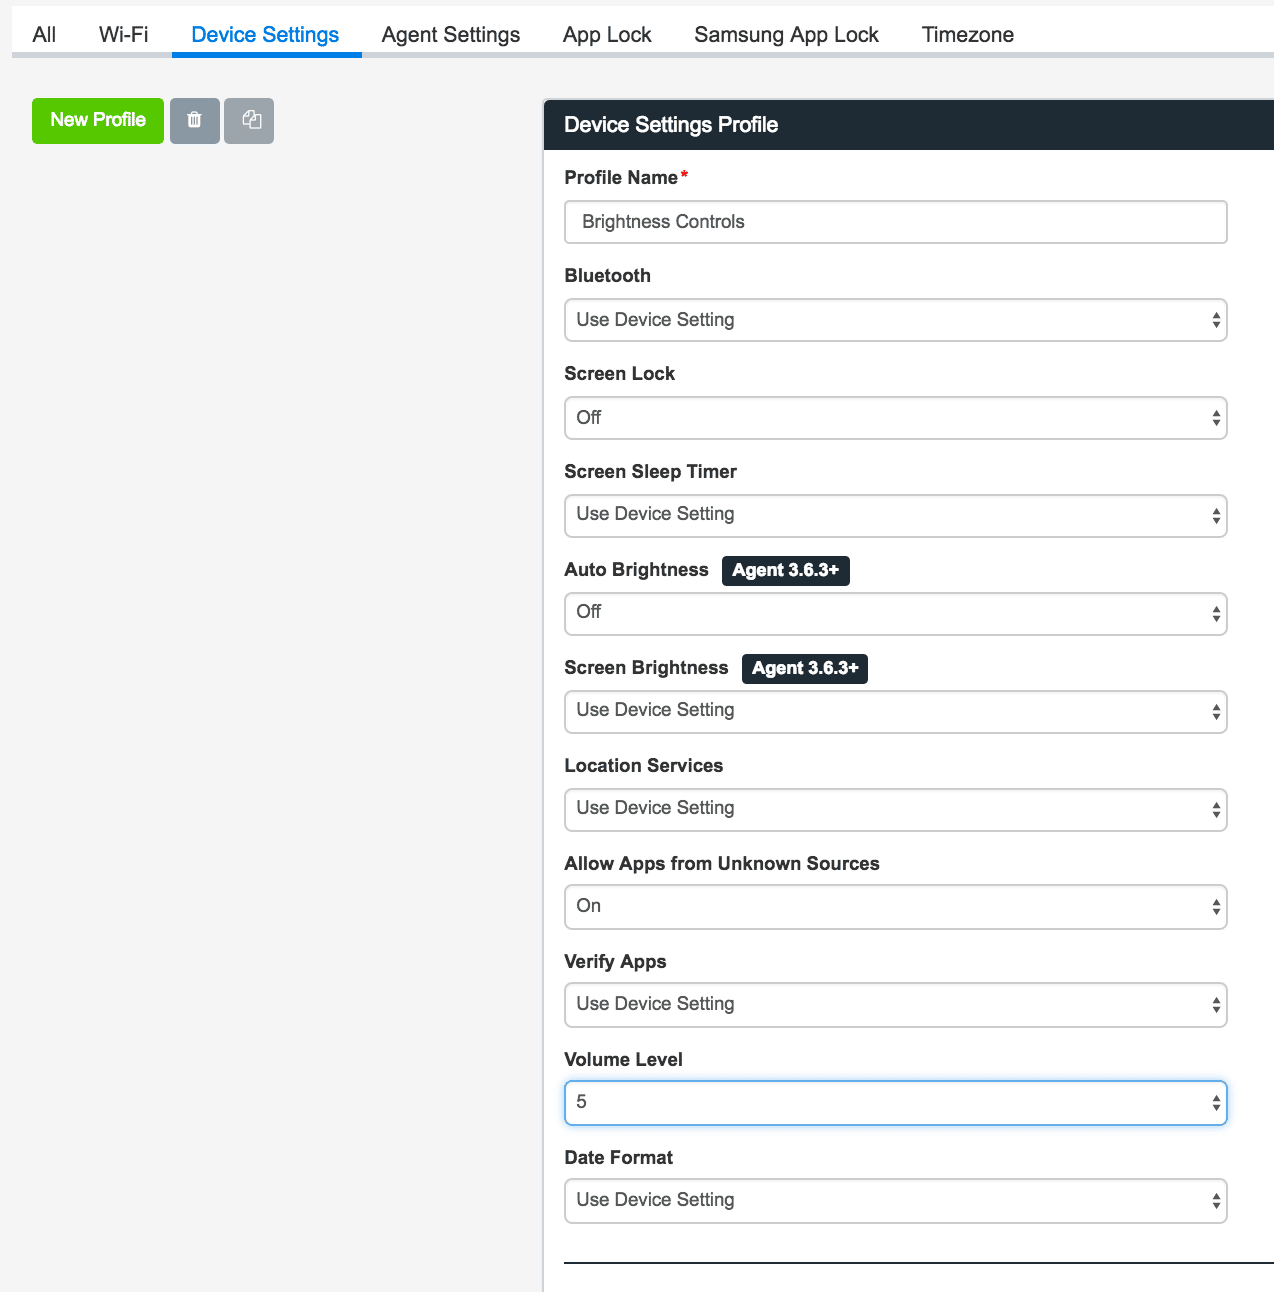
- Profile Name: Use your own desired naming practices for the profile name. Something easily identifiable and specific regarding the devices you are targeting will be beneficial if you plan on having multiple profiles
- Bluetooth: Enable or disable the Bluetooth function on the device
- Screen Lock: Enable or disable the device from Locking after inactivity or by the device being put to sleep via the power button or other methods. NOTE: This is not available on every device. It is recommended to test this feature before implementation
- Screen Sleep Timer: Determine the time that the device must be inactive before sleeping. NOTE: This is not available on every device. It is recommended to test this feature before implementation
- Auto-Brightness: Turn off auto-brightness and set the level manually or use the default device settings
- Location Services: Allows the device to utilize GPS, Wi-Fi, and/or Cellular to log the location of the device. Enabling this can affect the battery life of the device. Be mindful that certain apps require the use of Location services to function properly
- Allow Apps from Unknown Sources: Allows apps downloaded outside of the Google Play store to be installed on the device
- Verify Apps: Allows the device to scan for potential threats from apps downloaded on the device
- Volume Level: Set the volume level of the device to the desired level
- Date Format: Select from the three options for the date formatting on the device
After configuring the device settings as desired, click the Save button. The profile will be saved and can be pushed to devices from the Devices or Device Groups tab.
AGENT SETTINGS
Different from Device settings, Agent Settings allows you to customize a few features within Agent.
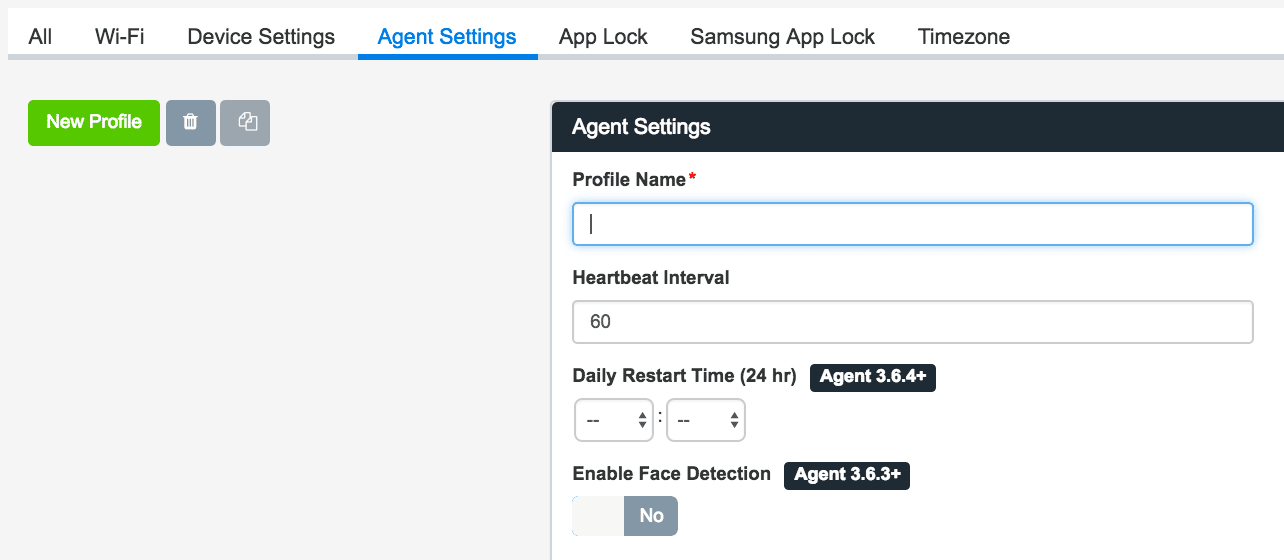
- Heartbeat Interval: Set the frequency (in minutes) at which the device will check it’s action queue with Moki
- Daily Restart Time (24 hr): Set a time the device will restart on a daily basis. This action is triggered from the device and therefore will run even if the device is offline and can’t communicate with Moki
- Enable Face Detection: Enable the device’s native Face Detection to allow certain analytics to come back to Moki’s Analytic’s dashboard.
After configuring the Agent Settings as desired, click the Save button. The profile will be saved and can be pushed to devices from the Devices or Device Groups tab.
APP LOCK
App Lock profiles control the UI of the device such as the soft navigation buttons, pull-down menus, and apps that will be run. We will break it down into the two sections listed in the profile, System UI and Watchdog
All System UI
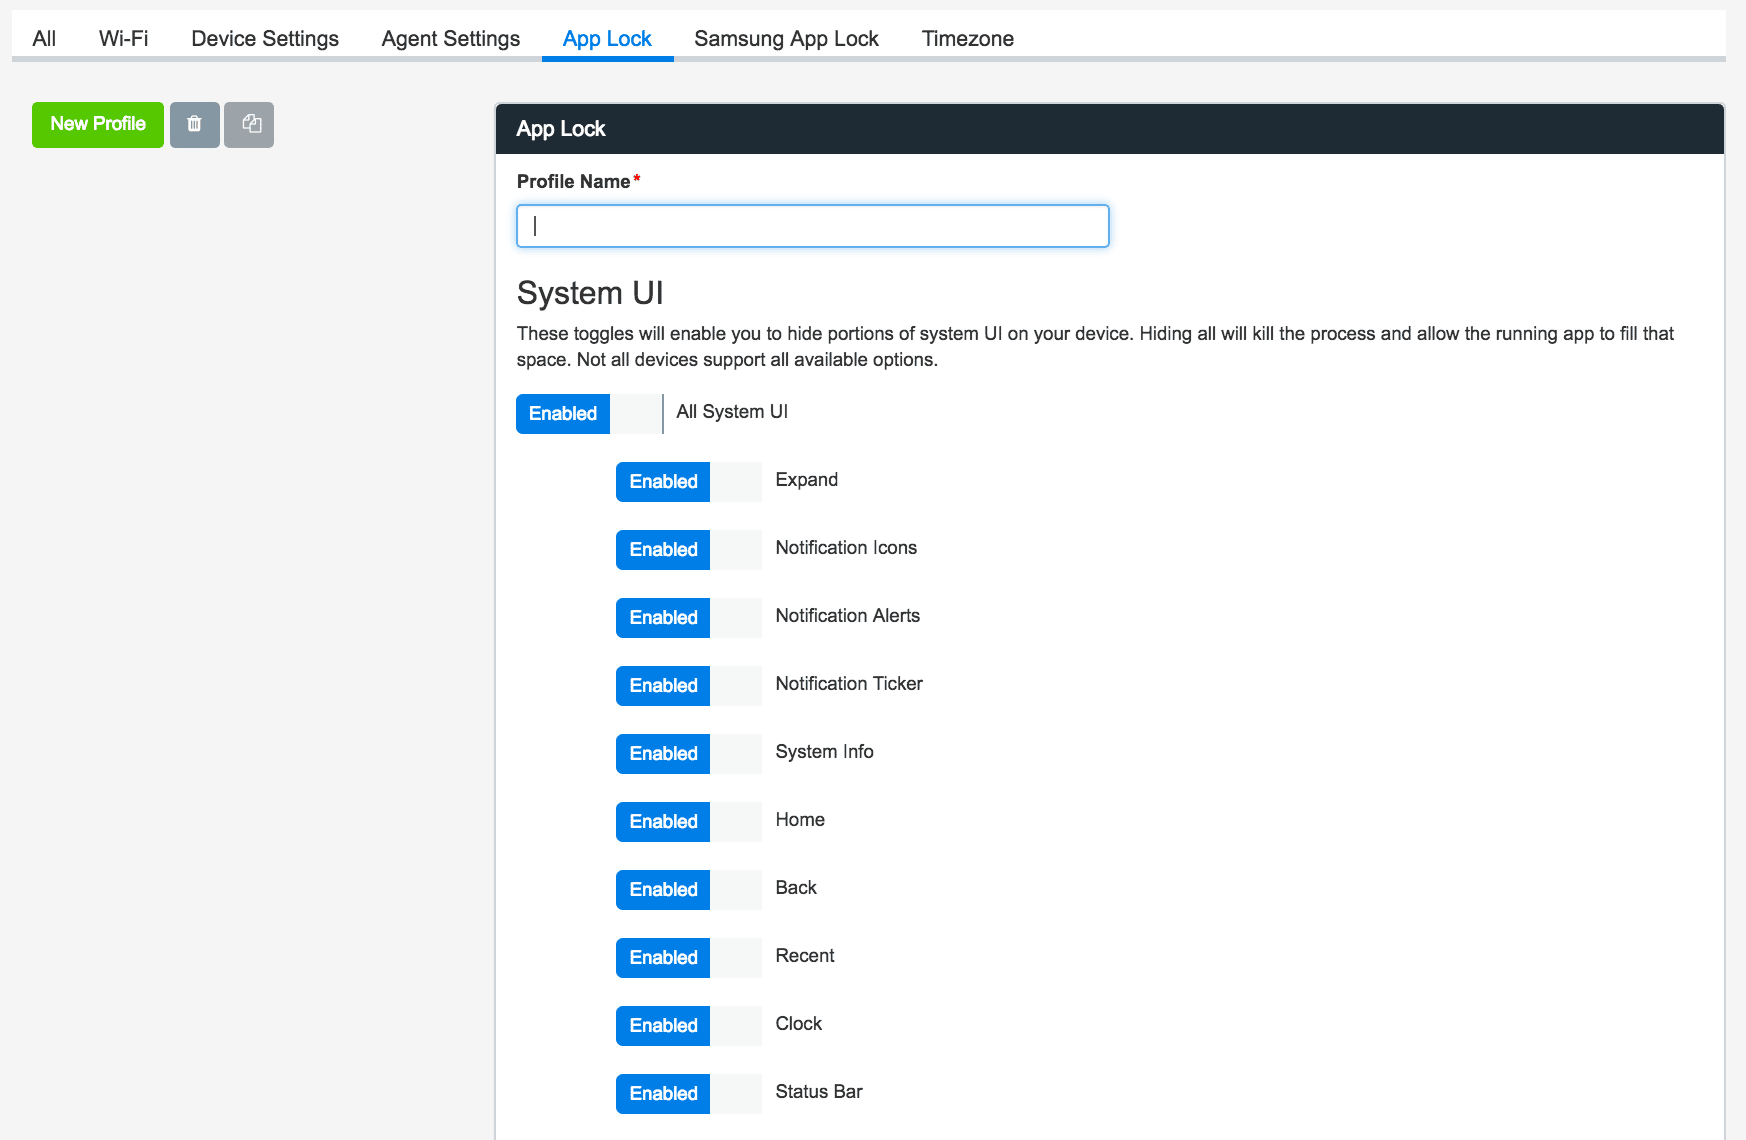
- All System UI: Disabling this will disable all the options underneath. All the options underneath must be in the Enabled switch for it to work, otherwise, only the parts of the System UI that you have disabled will apply
- Expand: Control the pull-down menu that can be pulled down from the middle or the right of the screen
- Notification Icons: Control the visibility of the notification icons that are displayed in the top left of the status bar
- Notification Alerts: Control whether notification icons are displayed in the top left of the status bar
- Notification Ticker: Control the notification ticker in the top left of the status bar
- System Info: Show or hide the system info, such as WiFi that appears on the top right of the status bar
- Home: This is the home navigation button that shows up on the bottom of the screen
- Back: This is the back navigation button that shows up on the bottom of the screen
- Recent: This is the recent navigation button that shows up on the bottom of the screen and allows you to bring up all running apps
- Clock: Control the clock that displays in the top right of the status bar
- Status Bar: Control whether the status bar can be displayed at the top of the screen, either through pull-down option or always
Watchdog
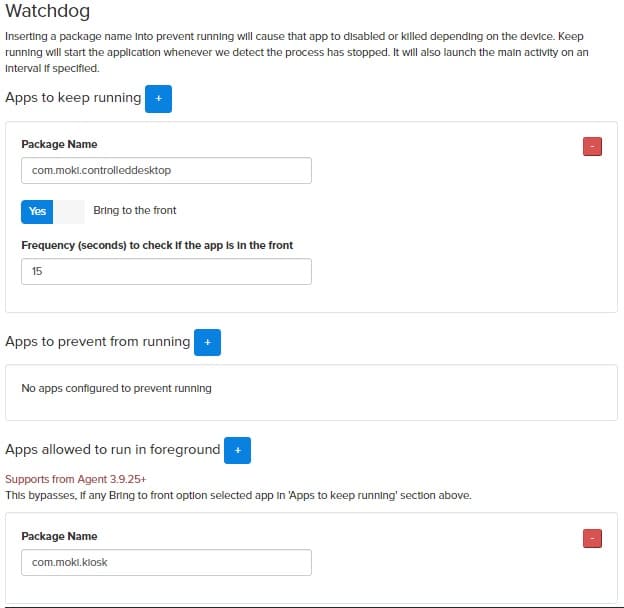
- Apps to keep running
- Package Name: Enter the package name of the app you want to run. If you don’t know the package name you can pull it from the Inventory in Moki. It will be listed as the Identifier as seen below

- Bring to the front: If you want the app to be forced to come back to the front if the app is ever exited or closed
- Frequency (seconds) to check if the app is in the front: The device will run a check at this interval and if the app isn’t on display it will be forced to the front
- Red minus button: Remove the app from Watchdog’s Apps to keep running section
- Package Name: Enter the package name of the app you want to run. If you don’t know the package name you can pull it from the Inventory in Moki. It will be listed as the Identifier as seen below
- Apps to prevent from running
- Package Name: Enter the package name of the app you want to be hidden from view and therefore inaccessible
- Red minus button: Remove the app from Watchdog’s Apps to prevent from running section
- Apps allowed to run in foreground
- Package Name: Enter the package name of the app you want to be allowed to run in the foreground. So if this app is opened while the App Lock is applied with an App to keep running, the App to keep running will not be pushed to the foreground when this app is opened.
*Requires Agent version 3.9.25+
After configuring the App Lock settings as desired, click the Save button. The profile will be saved and can be pushed to devices from the Devices or Device Groups tab.
SAMSUNG APP LOCK
Samsung App Lock profiles control the UI of the device such as the soft navigation buttons and hardware button, pull-down menus and apps that will be run. Samsung App Lock profiles will need to have an app in the Locked Application section.

- Locked Application*: This is a required field for Samsung and means that you need to put the package name of an app in here. If you don’t know the package name of an app on your device you can pull it from the Inventory in Moki. It will be listed as the Identifier, as seen below

- Home: Control the usability/visibility of the Home hardware button or soft navigation button
- Back: Control the usability/visibility of the Back hardware button or soft navigation button
- Recent: Control the usability/visibility of the Recent hardware button or soft navigation button. This button allows you to bring up all running apps
- Task Manager: When the Recent button is disabled it changes functionality to the Task Manager which allows you additional access to running apps and processes. If you want all functionality of the Recent button to cease then disable this option along with the Recent button
- Clear Notifications: Disable or enable the ability to clear the notifications that accumulate
- Navigation Bar: If you have soft navigation buttons this controls its visibility
- System Bar: Controls whether or not the system bar at the top is visible as well as the pulldowns. It is an all or nothing package. You can’t have the time showing without also allowing the pull down that allows access to the Settings app
- Status Bar: Controls the visibility of the status bar options in the system bar
- Power: Controls the usability of this button. With this disabled you cannot lock the screen from the device, it would have to be done from Moki
- Volume Up: Controls the usability of this button
- Volume Down: Controls the usability of this button
- SD Card: Controls whether an app can access the SD card files
After configuring the App Lock settings as desired, click the Save button. The profile will be saved and can be pushed to devices from the Devices or Device Groups tab.
TIMEZONE
Specify the timezone for the device, helpful if the device doesn’t update the timezone when shipped to its final destination.

- Select Timezone: First select the country and then you’ll get the options for that country
After configuring the App Lock settings as desired, click the Save button. The profile will be saved and can be pushed to devices from the Devices or Device Groups tab.
Philips Profile
How to Create/Delete a profile
- Make sure you find yourself in the Agent platform.
- Click on the Profiles tab, then find the New Profile button.
- You will then be presented with a drop-down. Click on the Philips Profile option. You may also click on the Philips Profile Tab across the top of the screen.
- The options for the Philips profile will be presented allowing you to modify your Profile. When you are satisfied with your Profile simply click Save on the bottom left-hand side of the screen.
Philips Profile Options:
- Profile Name– Enter the name of the Profile.
- Enable Admin Password– Allow a user to set the 4 digit pin to be used on the device. The password length can only be 4 digits (numbers only), nothing longer, and nothing shorter.
- Admin Mode Enabled– Allows a user to control if the device is in Admin Mode. If Admin mode is turned on it allows the password to be bypassed on the device.
- Ethernet Enabled– This feature allows you to control whether the device has access to use an Ethernet connection.For more information click here
