This tour will show you how to use the Alerts tab
Alerts within Manager make it easy for you to be notified when there are potential issues with any of your devices. Often times you’ll be alerted before anyone at the device knows there is an issue. There are alerts specific to MDM as well as alerts specific to MokiTouch 2 and apps that have our SDK injected. To learn more see this article called Apps Tour 5 – Alerts Tab. While alerts are available for all devices they must be activated. Alerts can be applied to all devices or they can be applied to specific subsets of devices through the use of Alert Groups. Alert Groups are organized through the use of tags. To learn more about tags see Manager Tour 8 – Tags Tab. We will show you how to create Alert Groups below.
Alerts were created with the ability to have different alerts on different devices with notifications going to different people. There is no limit to the number of people that can receive notifications and a great benefit is that those receiving notifications don’t need an account within Manager to receive notifications. This is beneficial for higher level managers who don’t need to concern themselves with the day to day configuration or management of devices but want to be alerted as to activity.
1 – Actions Bar

- + Icon – Allows the creation of an Alert Group, which allow alerts to be added to specific subsets of devices, as determined by tags. To learn more about tags refer to the article Manager Tour 8 – Tags Tab
- Creating An Alert Group
- Give the Alert Group a name and hit the Create Alert Group button
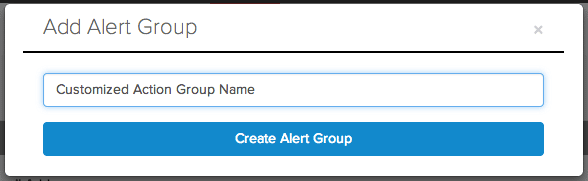
- Give the Alert Group a name and hit the Create Alert Group button
- X out of the box and select the Alert Group on the left menu
- Click in the text box under the Select Devices by Tags label and select all the tags that will receive this alert

- Trash Can Icon – Deletes the selected Alert Group
- View Logs – Pulls up all the alerts that have fired on the account. If alerts haven’t been set up then this will be blank. There are several categories listed
- Message – includes what device name and what alert was triggered
- Status – Gives the status of the message
- NOTIFIED – The device is still in this state. An email notification will only be sent once for the alert. Email notifications will not be sent when the status is cleared.
- CLEARED – The issue has been resolved. By default the Device Connectivity alert is set to clear upon issuance


- Last Update – The time the status was updated.
- Created – The time the alert was triggered for the device. Often the Device Connectivity alert is created and updated at the same time, this is because it is automatically cleared upon issuance. The time zone of the alerts should be the time zone of the computer you are viewing it on.
2 – Alert Groups
By default an All Devices category is created within the Alerts tab. To setup alerts for specific devices Alert Groups need to be set up (follow the steps listed above). Once an Alert Group has been created it will show up in this list. Only one Alert Group can be selected at a time. The available alerts are displayed in the middle part of the screen and discussed in the section below.

3 – Available Alerts
Alerts with an email address selected can be setup to send a notification or if no email is entered an exclamation icon will appear next to devices in Manager. Definitions for the alerts and when they are triggered are listed below the image.

- Select Devices by Tags* – Click in the text box to select from a list of previously created tags. The selected alerts will apply to any devices with one of these tags
- Email Addresses – Enter any email address you desire the alerts of this group to be sent to. Make sure you hit enter after entering the email address to get it to stick
- Send Test – This will send a test email to any addresses in the Email Addresses field
- SMS Phone Numbers – A text will be sent to the number listed. Enter the phone number with or without formatting
- Carrier Selection – A few of the most popular phone carriers are listed to select from. If your carrier is not listed then you’ll need to use the email alerts
- Device Checked Out – MDM profile removed, alert is triggered immediately if there is a connection
- Device Connectivity (Stopped Checking In) – Device not responding to hourly pings from Manager, alert is triggered after 2 consecutive failed attempts
- Unapproved or Out Of Date Apps – Any time an app is installed that isn’t listed here an alert will fire
- Device battery level – Based on the information received from the hourly pings from Manager, once a ping returns that the battery level is below the level listed the alert will fire. Battery level percentage applies to every Alert Group. If it is set for 50% in one Alert Group, that will be set to 50% for all Alert Groups. You cannot have one Alert Group with 50% and another with 20%.
- Device enrollment – When a device is enrolled into your MDM account an alert will fire
- Unapproved or out of date OS version (Based on account preferences) – If a device’s OS is not listed in the approved list (found in your Account Settings) then the alert will fire
- Save button – Any additions or changes to tags, email addresses, phone numbers or alerts requires the Save button to be clicked or changes will be lost
4 – Alert Delivery Methods
There are three delivery methods, email phone and URL. Here is how to use them.
- Email – Type in an email and hit Enter. Add as many emails as you would like, regardless of whether they are a user in Moki or not. Emails will get sent when one of the checked alerts fires. The email contains the device information and has links to easily access the device
- Phone – We will send an SMS text to a limited set of mobile carriers. The list of approved carriers is:
- AT&T
- Spring
- T-Mobile
- Verizon
- Rogers
- Telus
- URL – We can send to your own webhook, such as requestb.in. Copy your “bin” URL and alerts will be sent there
5 – Frequently Used Alerts
Example 1: Device Loses Connectivity to Manager or the Battery is Below 50%
- Select the Alert Group or Create a new Alert Group you want this series of alerts to be on
- Select the appropriate tags for the devices of this Alert Group
- Enter the email address or phone number for those receiving notifications
- Click the Device Connectivity box
- Click the Device Battery Level box and select 50% from the drop down on the same line
- Click Save

Example 2: A Device is Enrolled or Unenrolled in Manager
- Select the Alert Group or Create a new Alert Group you want this series of alerts to be on
- Select the appropriate tags for the devices of this Alert Group
- Enter the email address or phone number for those receiving notifications
- Click the Device Enrollment box
- Click Save

6 – Alert Email Example

